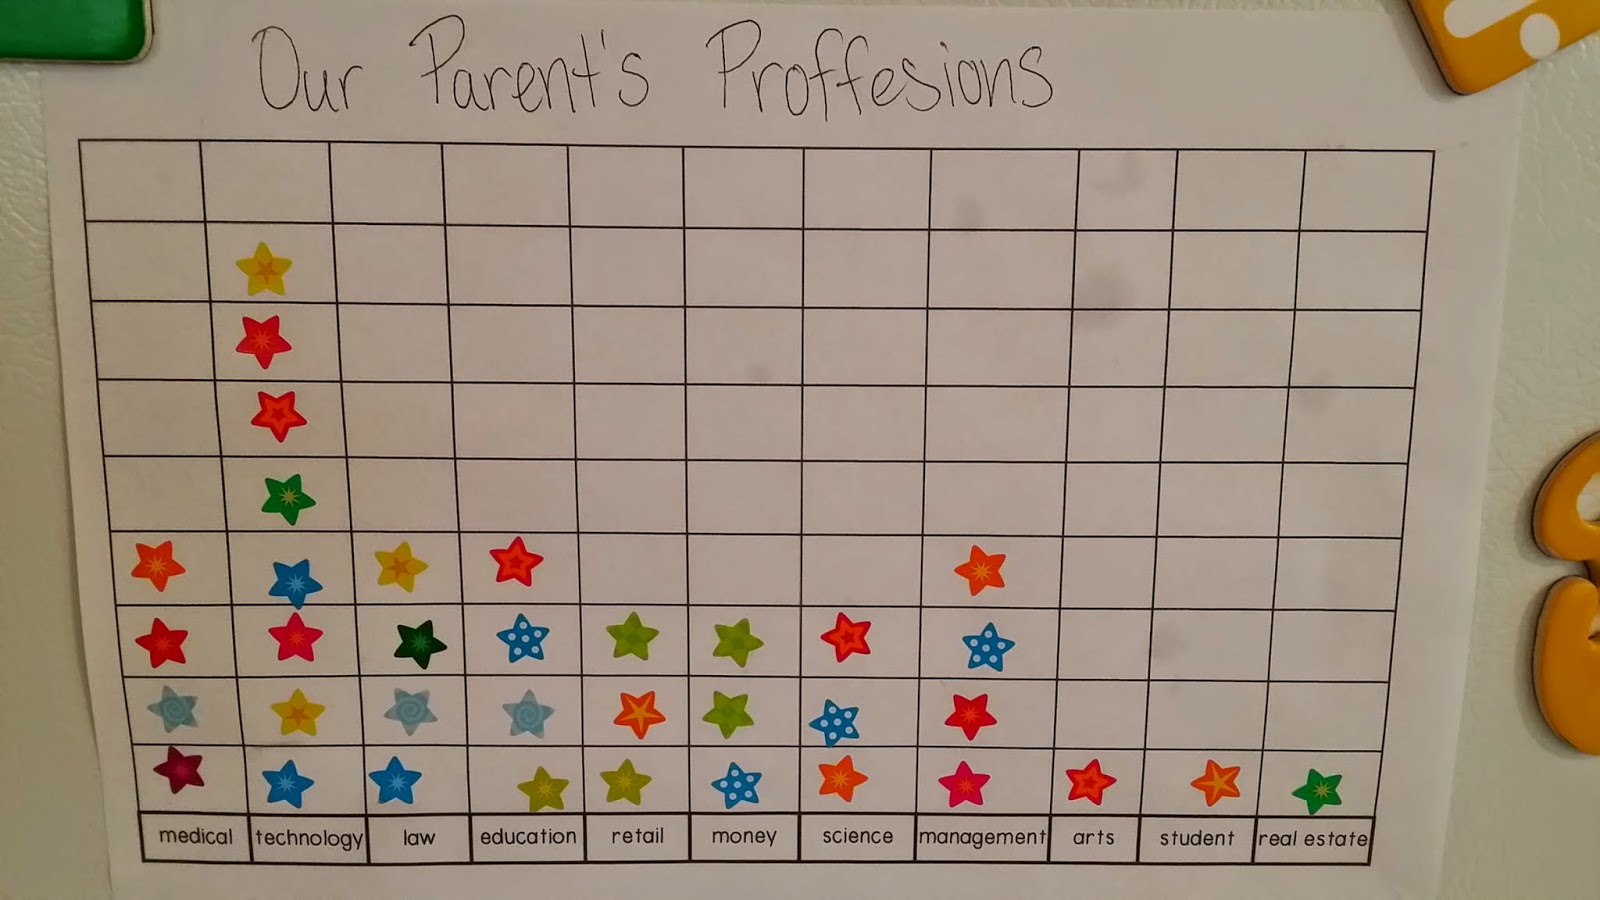
 The kids love career week, it gives them a chance to explore the possibilities, to tell stories about themselves or people that they know, and at the end of it all, to dress up! So we did lots of fun activities, including one where they drew a picture of what they wanted to be and then said why they wanted to be that; but the pictured activity on the right, is a graph we made of each of the students' parents professions, which was a lot of fun. I already knew all the parent's technical titles and then I reduced those to an easier level of understanding for the children. Then they went through and were able to put a star on the proper group, one for their father and one for their mother. It really got the students to talk about jobs and to explore their friends, especially after hanging it up on the fridge for another week or so where they could always come back to it. You can find my activity packet here.
Tuesday, June 3, 2014
Career Week
The kids love career week, it gives them a chance to explore the possibilities, to tell stories about themselves or people that they know, and at the end of it all, to dress up! So we did lots of fun activities, including one where they drew a picture of what they wanted to be and then said why they wanted to be that; but the pictured activity on the right, is a graph we made of each of the students' parents professions, which was a lot of fun. I already knew all the parent's technical titles and then I reduced those to an easier level of understanding for the children. Then they went through and were able to put a star on the proper group, one for their father and one for their mother. It really got the students to talk about jobs and to explore their friends, especially after hanging it up on the fridge for another week or so where they could always come back to it. You can find my activity packet here.Wednesday, May 21, 2014
Luck o' the Irish

Happy St. Patrick's Day to you! We had a lot of fun St. Patrick's day fun and I wanted to share it all with you! The above image is our display board of little leprechauns (their handprint cutout on cardstock with a little green construction paper hat on top; I drew their faces with a black sharpie). This was fun and the parents all thought their little faces were adorable, but the true hit of the display was the cloud rainbows.
 The cloud read: "If I found a pot of gold and a leprechaun gave me 6 wishes I would wish for a rainbow of things" (this worked out great because we also had been learning about rainbows in class). Then on each rainbow colour we wrote down the wish that the students would ask for and boy-oh-boy there were some funny ones! The kids absolutely loved sharing it with their parents too.
We teachers also captured a leprechaun early in the morning before the students arrived and placed him in a box to show them later...but he magically escaped and left us clues to find his hidden treasure. Our simple treasure hunt had our kids reeling with excitement and when they eventually found his pot of gold (a painted black cottage cheese container with a black pipe cleaner as a handle filled with cuties) they were overjoyed!
Tuesday, May 20, 2014
Sticker Charts are Overrated

So many teachers do sticker charts and they're just SO overrated....sure the concept works and the students love it. But there is so much waste in this style of a reward program....so what did I decide to do? Make something a little more re-usable that sparked a little more creative process. Instead of a sticker, the students earn a "step" from the village toward the castle and when they reach the castle they earn a prize and then they start all over at the village again. The kids love it and the fun images that appear along the way (wishing well, unicorn, dragon, and mermaid [not pictured]). I just googled images online for the moving characters (2 styles of princesses [one more feminine and one more ranger style] and 2 styles of princes). The kids love it and I'm not wasting paper and stickers.
These are the guidelines I use:
 |
| find it on my TPT site here |
Sunday, May 18, 2014
Food Pyramid

They loved this unit and at meal times the kids were always telling us which section their food items would go into and what other foods went into which sections and which foods were good for you and which weren't.
Wednesday, May 14, 2014
Handprint Valentine
 The children really enjoyed making these little poems for their father's for Valentine's Day! I found the poem online and I really liked it, I did edit the last line (it read something like, "when I was so little") to say the age that they were (so 3, 4, or 5). I pulled each kid individually to do their hand because it would be much simpler that way than trying to do it in a full class setting. I used a foam heart shaped sticker and placed it on their hand and then I painted their hand with their choice of colour (I had 3-4 colour options). After they had dried I pasted them to pink construction paper (in retrospect, I probably could have pasted to construction paper first and it may have helped with the warping of the paper as the paint dried...but I don't know for sure). The kids just loved giving the project to their fathers and the parents thought the poem was quite cute as well. Another cheap, fun, and sentimental gift!
Friday, May 2, 2014
Measuring Up


I took different coloured sheets of construction paper and made 1 inch and 1/2 inch marks with a black sharpie to make it look like one very long multi-coloured ruler. I finished it all off by covering it contact paper (if you continue to follow my blog, you will find that I am a BIG fan of contact paper!)
I just used yarn and little "speech bubbles" (which I wrote their name on and also covered in contact paper) and I adhered it to their height with a little bit of scotch tape! I then used a dry erase marker to write their height on their name!
Thursday, May 1, 2014
Owl Always Love You

It was February and I needed a cute wall display that the kids could help me create. I hopped on the internet to browse for ideas and this is what I came up with. The idea was to put up letters that read "Owl Always Love You" but I never got around to that because, seriously, who has time to write and cut out all those letters?
Anywho (no pun intended) the kids loved making their owls. I printed and cut out several different types of eyes, all the hearts for the faces, beaks, and the owls themselves; then the children picked out what they wanted and glued them to the bodies. It was simple and yet adorable for everyone!!
Subscribe to:
Posts (Atom)


